In this article we will provide a quick start guide for SX-PY with full source code
In this article:
An overview of SX-PY
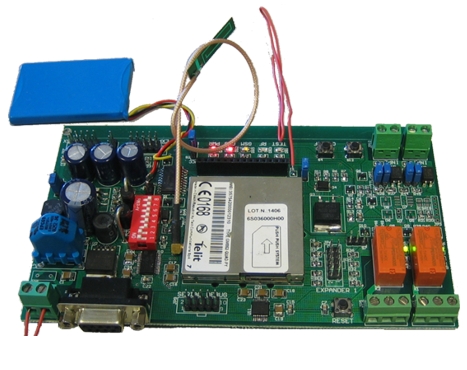
The SX-PY board has been developed to fully unleash the power of Telit Python modem engines
www.telit.com.
In a little space of 156x85 mm we found the GM862-PY modem (not included), a complete switching power supply section with battery backup, the debug serial line, the communication serial line, input and outputs lines.
In the following the main features are listed:
- Filtered power supply 9-15V CC/CA
- Connector for battery backup (not included) with charge circuit
- Power fail detection
- Residual battery level available in Pyhton script via AT interface
- GPS Receiver (available only with GM862-GPS module)
- RS232 serial line for uploading the scripts
- RS232 serial line for script debug
- 2 optocoupled input lines
- 2 relays outputs (48V/2A)
- 1 FLEX expander for SX16B board (SX16B - IN/OUT expansion board) or FLEX boards to extend the number of input and outpus
- 1 expander for customer hardware
- 1 host for ER400TRS serial radio module (How to for SX ARM Linux)
- 1 reset button
- 1 test button
- Power Led, Battery Charge Led, GSM Led, RF data Led and Test Led
The SX-PY can be equipped either with GM862-PY engine or GM862-GPS engine that embeds a SiRFstarIII� GPS receiver. With the GPS feature we can write a powerful geographic localizer in a minute!
To use all the test scripts described in this article you need the following hardware:
- SX-PY Board
- Telit GM862-PY or GPS engine
- GSM Antenna with MMCX connector
- Power Supply 12V
- 3.7V Lithium Battery
- 9 poles flat cable with female DB9 connector
- ER400TRS radio module
- Serial DB9 male/female serial cable
- A PC with Windows operating system
The development software
To start working with out SX-PY we dont need any particular tool: the only useful software are a good text editor (like Ultraedit www.ultraedit.com) and a serial console like Hyperterminal.
The Pyhton language is interpreted and does not need a compiler: we must only write our script in a text file, save it with the .PY extension and upload it on the modem.
If you want you can also pre-compile the script to speed up the execution: the how to is available at the address How to compile Python scripts for the Telit module.
If you need a start guide or documentation about the Pyhton language you can start from the following addresses:
http://www.python.org/
http://www.hetland.org/python/instant-python.php
http://www.python.it/
http://www.telit.co.it/data/uploads_EN/products/80000ST10020a_r0.pdf
When you have your .PY script (or the compiled .PYO) you must upload it on the modem using the AT commands.
You must connect the SX-PY serial port labeled SERIAL-DCE to the PC (using a straight cable with at least TX, RX, GND and DTE):
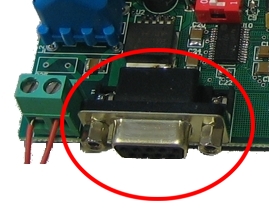

the dipswitches 1 and 2 of S5 must be on the ON position.
Then you must open the serial console software and use the special AT commands to upload the script:
- To upload a file in the modem AT#WSCRIPT = "<filename>", <size>
- To enable the execution AT#ESCRIPT = "<filename>"
- To delete a file from the modem AT#DSCRIPT = "<filename>"
- To view a list of the files uploaded AT#LSCRIPT
The details of the AT commands for the scripts is available in the article: How to execute a Phyton script with Telit
A quick alternative to this complicate procedure is the SxPyDownloadTool developed by Area SX and freely available at the address SxPyDownloadToolSetup.zip
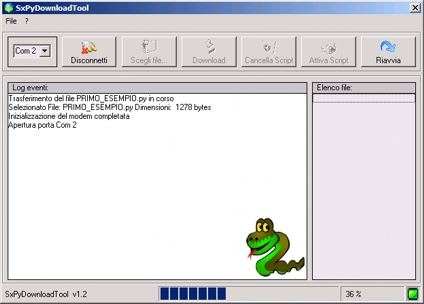
This software allows you to upload, execute, list and delete the Python scripts in a very simple way. More informations about this tools are available at: SxPyDownloadTool :Python script management for Telit modem engines
Powering the SX-PY
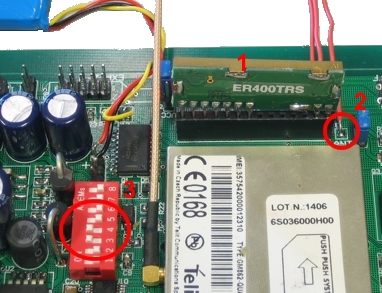
The SX-PY must be powered through the PWR IN connector, with a voltage between 9 and 24V (both CC or AC). The connector is labeled "1" on the following picture:
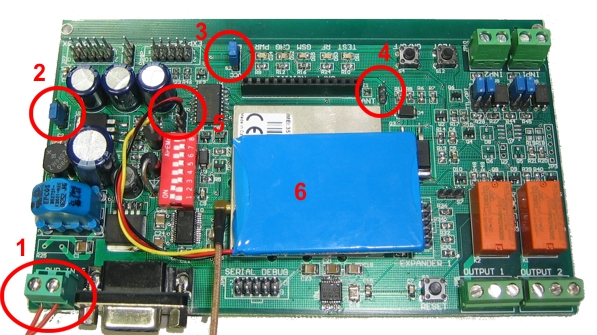
The SX-PY is also ready to host and charge a lithium battery (point labeled "6" in the previous image) that can power the Telit modem for about two days (with the modem registered on the GSM network but not trasmitting nor receiving).
When the board is powered through the battery it is not possible to use the output relays (K1 and K2) and it is not possible to draw the 5V power from the expanders.
Powering the SX-PY without the backup battery
If you use the SX-PY without the backup battery you must: put the S3 jumper (label "3" in the image) in the VCC position and the W1 jumper (label "4") opened. To switch on/off the board you can open and close the S1 jumper (label "2"). The Power Led that is close to the S3 jumper (label "3") indicates the power status.
Powering the SX-PY with the backup battery
To use the backup battery the jumper S3 (label "3") must be put in the BAT position and the W1 jumper (label "4") must be closed. The battery must be inserted on the JP1 connector (label "5" on the image) taking care of the polarity.

 The inversion of the battery can damage the modemd.
This jumper configuration without the battery can damage the modem.
Using batteries other than the one provided by Area SX is not guaranteed. The battery charging status is shown by the led CHG.
- If the led is full on the battery is charging
- If the the is flashing the battery is nearly charged
- If the led is off the battery is fully charged
The first example
The first Pyhton example is only a small test to start working with SX-PY.
In the small script we will see how to include external modules, setup the IO lines, using variables, loops, sleeps and conditional braches.
The first difference between the Python language and the other languages is that Python uses the indentation in place of the parenthesis like we see in the following table:
| C or PHP: |
Python: |
if(condition){
insruction
} |
if(condition):
instruction |
A wrong indentation can result in a non working code in our Python script.
The official Pyhton documentation, available at www.python.org, describes the correct syntax for all the commands.
To run the example the following source must be copied using our preferred editor in a text file and saved with the .PY extension (by ex. PRIMO_ESEMPIO.py).
Using file names with spaces is not reccomended.
#Modules Import
import GPIO #IO lines manager
import MOD #Timer Manager
#Setup of IO directions
r=GPIO.setIOdir(2,0,1) #port 2 output, default 0
r=GPIO.setIOdir(6,0,1) #port 6 output, default 0
r=GPIO.setIOdir(7,0,1) #port 7 output, default 0
i=0 #variabile i
while (1): #Endless while loop
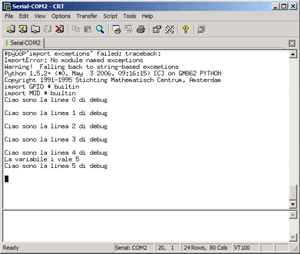
#Debug line
print "Ciao sono la linea %d di debug" % i
i=i+1
#IF instruction
if(i==10):
print "la variabile i vale 10!!"
elif (i==5):
print "La variabile i vale 5"
else: #else
print ""
#Led "TEST" flash
s=GPIO.setIOvalue(2,0) #Set to 0 GPIO2
MOD.sleep(10) #One second delay
s=GPIO.setIOvalue(2,1) #Set to 1 GPIO2
MOD.sleep(10)
Using the SxPyDownloadTool software to upload the example on the Telit modem you must follow those steps:
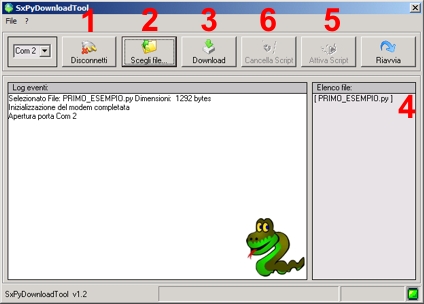
- Select the serial port number and click on the button "Connetti"
- When the modem check is done the button "Scegli file" is enabled and you can choose the file to upload clicking onto this button
- Click on the "Download" button and wait for the download to complete. You can follow the progress on the bottom status bar.
- When the download is complete the "Elenco file" window shown the new file: click onto it to select
- To enable the script to run on the next reboot of the SX-PY board just click on the "Attiva script" button.
- Close the serial connection and unplug the serial cable
- Restart the board
- If you want to delete the script click on the Cancella Script" button
The described procedure can be accomplished only if there are no script running. If you have a script running youi must reset the modem by pressing the Reset button on the SX-PY.
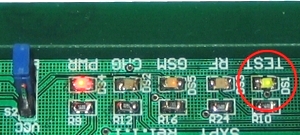
When we restart the modem the TEST led starts flashing.
To debug the Python script you can insert in your code the print "string to view" instruction. When the script runs the printed strings are outputted on the debug serial line. The debug serial line is available on the 10 poles (5+5) connector labeled "SERIAL DEBUG": to connect to this serial line you can use the optional serial cable SX.FLAT.RS232.
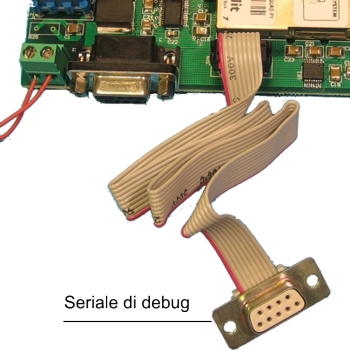
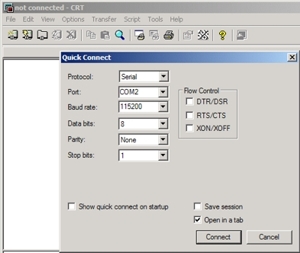
The debug serial line is not available on the GM862-GPS. In this version that serial line is used to send the NMEA GPS senteces. To view the debug strings i you must open a serial console and set the connection speed at 115200bps and disable the flow control.
 Source:
PRIMO_ESEMPIO.zip Source:
PRIMO_ESEMPIO.zip
Driving the output relays
The SX-PY is equipped with two relays that can drive loads up to 48V with a maximum current of 2A. The output relays are controlled by the GPIO 6 and 7 of the Telit modem.
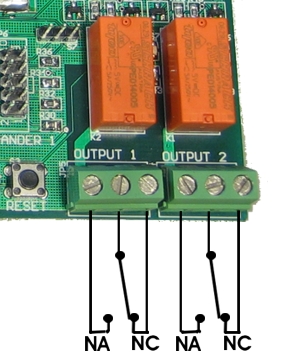
The GPIO6 controls the K1 relay while the GPIO7 the K2.
The lines can be drive both from the Python script or directly from the AT commands.
To activate the K1 relay you can send on the SERIAL DCE the AT command:
AT#GPIO=6,1,1
to deactivate:
AT#GPIO=6,1,0
The same procedure can be done on the GPIO7 line
The status of each relay is shown by a green LED that is placed close to the relay itself.
The following Python script shows how to drive the relays from the scripts. You must just copy it to a .PY file, uplaod it to the modem and run it: the relays will change state every two seconds.
import GPIO

import MOD

print "\r\nTEST RELE'\r\n"


#SETTO LA DIREZIONE DEI PORT

r=GPIO.setIOdir(2,0,1) #setto il port 2 come output e ha come valore di default
0

r=GPIO.setIOdir(6,0,1) #setto il port 6 come output e ha come valore di default
0

r=GPIO.setIOdir(7,0,1) #setto il port 7 come output e ha come valore di default
0


while(1):


print "Rele' K1 ON\r\n"


s=GPIO.setIOvalue(6,1)


MOD.sleep(20)


print "Rele' K2 ON\r\n"


s=GPIO.setIOvalue(7,1)


MOD.sleep(20)


print "Rele' K1 OFF\r\n"


s=GPIO.setIOvalue(6,0)


MOD.sleep(20)


print "Rele' K2 OFF\r\n"


s=GPIO.setIOvalue(7,0)


MOD.sleep(20)
Source:
TEST_RELE.py
Checking the input lines status
The SX-PY has two optocoupled input lines that can be also configured to work as a simple TTL contacts inputs.
The TTL contact feature allows you to connect on the input connectors (JP10 and JP11) a 5V tension or a contact from a switch or a button. If you use the optocoupled configuration the input can be connected to a tension from 5V to 24V.
To set the TTL mode for input 1 you must place the S9 and S11 jumpers as in the following image:
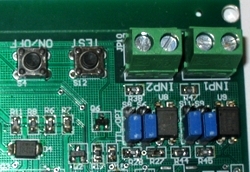
The TTL mode for input 2 works in the same way and it is controlled by S6 and S8 jumpers.
To set the optocoupled mode for input 1 you must place the S9 and S11 jumpers in the OPT position, as in the following image:
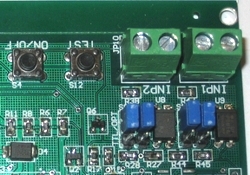
Once again the optocoupled mode for input 2 works in the same way and it is controlled by S6 and S8 jumpers.
The two input lines are, of course, completely independent and can be configured one in TTL mode and the other in optocoupled mode and viceversa.
The input line labeled INP1 is connected to the GPIO1 line while the input INP2 and the S12 button are connected to the GPIO8 line od the modem.
import GPIO

import MOD

print "\r\nTEST INPUT'\r\n"


#SETTO LA DIREZIONE DEI PORT

r=GPIO.setIOdir(7,0,1) #setto il port 7 come output e ha come valore di default
0

r=GPIO.setIOdir(6,0,1) #setto il port 6 come output e ha come valore di default
0


r=GPIO.setIOdir(1,0,0) #setto il port 1 (INP2) come input

r=GPIO.setIOdir(8,0,0) #setto il port 8 (INP1) come input


while (1):

    if(GPIO.getIOvalue(1)==0):

        print "VALORE GPI 1 == ZERO\r\n"

        s=GPIO.setIOvalue(7,0) #Rele' K2 Off

    else:

        print "VALORE GPI 1 == UNO\r\n"

        s=GPIO.setIOvalue(7,1) #Rele' K2 ON


    if(GPIO.getIOvalue(8)==0):

        print "VALORE GPI 8 == ZERO\r\n"

        s=GPIO.setIOvalue(6,0) #Rele' K1 Off

    else:

        print "VALORE GPI 8 == UNO\r\n"

        s=GPIO.setIOvalue(6,1) #Rele' K1 ON


    MOD.sleep(10) #Pausa di un secondo
Source: TEST_INPUT.py
RF serial trasmission with ER400TRS
The SX-PY, optionally, can be equipped with the ER400TRS serial radio transmitter to allow data transmission over a 433MHz radio link.
The maximum range of the ER400TRS is 250m.
If you want more information about this module you can read: Trasmissioni in Radiofrequenza facili con Easy Radio

To install the ER400TRS module on the board it is only needed to solder the module on the host labeled U5, add a picece wire with a lenght of 17cm (or 34cm if you want an half lambda antenna) on the point labele "2" in the following image and put the dip switches 3 and 4 of S5 in the ON position.
The dipswitch S5 controls the serial line connection according to the following table
| Dipswitch |
Peripheral |
| 1 and 2 ON |
Serial RS232 "SERIAL DCE" |
| 3 and 4 ON |
RF module |
| 5 and 6 ON |
Serial on EXP2 |
The serial peripherals cannot operate simultaneously.
To allow our script to control the serial line it is needed to include the SER module using the import directive.
import MOD

import SER


r=SER.set_speed('19200') #Setta la velocit� della seriale

i=0

while (1):

    text='Test Seriale Modem TELIT Py %d\r\n' % i

    r=SER.send(text) #trasmette dati

    i=i+1

    r=SER.receive(10) #riceve dati

    print "RX> "

    print r

    print "\r\n"

    MOD.sleep(10)
Source:
TEST_SERIALE.zip
The serial RF link can be used to drive the
SX16-RF a copmplete wireless I/O board, or to connect the SXPY to a PC with the
USBRF04 module.
Sending an SMS
A very simple operation with the Telit Modem is to send and receive SMSs. The example script that we will see in this section will allow us to send a message whenever the button on the SX-PY is pressed.
The Python library MDM is extremely useful at this pourpose because it will allow us to send AT commands to the modem in a very simple way
MDM.send("AT") #Invia la stringa AT al modem
MDM.receive(3) #Attende la risposta per 3 sec ptima di uscire per timeout
In our test script we will use the folowing AT command to send text messages
AT+CMGS="xxxxxxxxx"
>message
^Z
where xxxxxxxxx is the destination number.
More information about the AT commands supported by the Telit modem are available in the official documentation that you can dowload from the site: www.telit.com.
Source:
TEST_SEND_SMS.zip
In the source code, apart from the function that sends the SMS:
def SendSMS(gsmnumber, message):
is defined another function named InitModem:
def InitModem():
That function checks the modem status, sets the TEXT mode for SMS transmission and sets the service center number.
This number, that is different for each GSM operator, is set in the_SERVICE_CENTER variable.
Before you upload the script on the modem it is also needed you to set the destination number of the SMS that is stored in the
_GSMNUMBER variable.
With the Telit GM862 modem you can use ONLY GSM SIM card. The modem does not supports UMTS SIM cards. Receiving an SMS
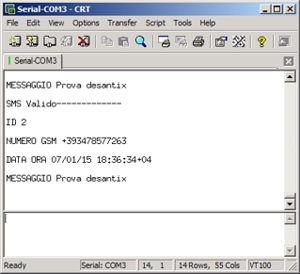
The same MDM library that we used before helps us also to receive SMSs from the modem. The sample script will report the received messages on the serial console.
The AT command that we will use to read the SMS from the SIM card is
AT+CMGR=index
where index is a number between 1 and 10 that specifies the location that we want to read.
Sending the sequence of commands:
AT+CMGR=1
AT+CMGR=2
....
AT+CMGR=10
whenever a message is received the modem will send to us a string like:
+CMGR: "REC READ","+393xxxxxxx",,"07/01/15,18:36:34+04"
Text of message
OK
If the required location is empty the modem will return:
+CMS ERROR: 310
Source:
test_read_sms.zip
Checking the power supply status
To let the modem detect the main power failure the backup battery must be installed with the correct configuration (reported in the section Powering the SX-PY).
The AT command that we use to check the power status is AT+CBC?. The answer to this command is the same +CBC: string followed by two numbers.
The first one is 0 if the modem is powered from the battery, is 1 id the power is drawn from the main power supply.
The second one is 0 if the main power supply is present; if we are running using the backup battery the value will be 100, 75, 50 ,25, 0 reflecting the residual charge value.
External power supply ok:
AT+CBC?
+CBC: 1,0
OK
Powered from backup battery:
AT+CBC
+CBC: 0,100
OK
The test source sends periodically the AT+CBC? command and it analyzes the answer. Whenever the main power supply fails an alarm message is displayed on the debug console with the value of the battery level. If the battery value falls under the 25% the firmware sends the command AT#SHDN to shoutdown the modem.
Source:
test_alimentazione.zip
Download
Schematic Sheet of SX-PY:
SXPY_SchemaElettrico.pdf
Component topology of SX-PY:
SXPY_Topologico.pdf
Tool
SxPyDownloadToolSetup.zip
Related Articles
GSM Remote control with Python: power and easy of use
How to execute a Phyton script with Telit
Espandere ingressi e uscite della GSM485 collegando la scheda EXP485
GPRS connections with the SXPY board
How to compile Python scripts for the Telit module
Segnala questo articolo:
Tags: - Domotica - How-To - Python - Schede Area SX - Telecontrollo -
| 


 Articles


 Area SX store


 Click here to request a quote for quantities above 10 pieces


